


Pingouin TP3 Garter Stitch Knitting Machine
- Maggi Bloice

- Jun 10, 2023
- 5 min read
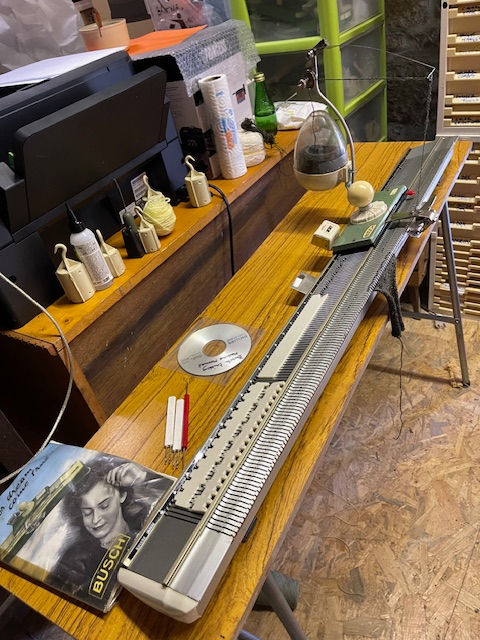
Pingouin TP3 Garter Stitch Knitting Machine

Gauge 5 mm with 200 needles.
I did initially look into this fantastic machine and count myself fortunate to be able to buy and even better to have it posted to me from the south of France - believe me when I say this was no mean task as it is exceptionally heavy.
It looks like a lovely 1960’s orientated piece of furniture. The machine on its own is a reasonable weight but when you add the carriage which is made of heavy metal with a large wooden handle and the absolutely necessary weights it is a heavy but well built machine.

As it is very rare, it is hard or nigh on impossble to get spares and especially the needles which as per all garter stitch machines are double latched. When I came to Brittany I did managed about 10 years ago to buy one but the seller renaged on the deal, but such is life and boy was I disappointed. It is very hard work getting your hands on any machine in France as its a big country and most sellers will not even consider postage and to be honest in this case who can blame them. When I visited Australia, I was able to buy a few needles ie 10 for my earlier Pingouins but it cost me a small fortune.

Ironically just after I bought the first TP3, I was able to get my hands on another which was sold only about 20 kms from me - this one was being sold as spares but who cares, but I was very very lucky as the old couple had very little idea of what part was what as it belonged to their parents (hell makes me feel old, as I would just be about the same age). They got no argument from me and I packed the thing into my car and took it home.
It was exactly the same as the one I had bought previously except that the carriage was missing a couple of peices. The shamrock shaped red plastic or similar bit was missing and the tension wire at the side of the carriage was snapped off, apart from that it was a lovely and well used machine but the biggest bonus was the amazing packets upon packets of needles - whoever owned this machine loved it for sure. Now I have enough spares to see me through my lifetime at least.

Now I had to think about a way to get this one working - it needs a special method of tensioning, and the 2 bits that were required were missing, so I had to consider a way of attaching a modern tension stand onto the machine. It has a slider rail upon which most things such as the very unusual wicker yarn basket and row counter are attached so I delved into my ton of spare bits and pieces and after a bit of thought I realised that the Superba Machines have a similar rail so I took a the end bit of this and somehow managed to drill a larger hole to accommodate the bolt that fixed the tension rail to the back of the bed, and with some adjustment the machine now has a Superba tension stand and it works wonderfully well. Voila, my second TP3 machine.

Back to the original machine which was fully equipped, the way you cast on is with a very heavy metal comb which you have to protrude through the beds and then thread with elastic so that the comb hangs on the needles which are laid by hand across the bed. Once you do this you have then to add a heavy weight rod which fits into the comb. After this comes the the threading up of the yarn, it comes via the basket or in my case a cone on the floor, through the little shamrock thing on the back of the carriage, then through the short tension wire at the side of carriage then again through a metal shuttle type piece and this is slotted into the provided slot on the carriage. It takes less time the more you use it - it took me hours to figure the whole thing out as the instruction manual leaves a lot to be desired.

Once you have done this, then the easiest cast on for a beginner is a simple one by one rib and for this you set your needles up one by one, and set the sliders on the carriage to cotes (the settings are in French so I made a small card out to assist me) and the tension setting for one by one rib - it is then a case of sliding the carriage back and forth. To change to different setting you use the needle selector rulers and it really is as simple as that for garter, rib, fishermans, plain or purl. However, I can see no way of a holding position, other that removing the needles altogether and if you were to simply change colours for stripes - no problem - to decrease I guess you have to simply put the stitches onto the next needle but to increase you would have to find a way of weighting the increases and edge weights are supplied for this. There are books of stitch patterns and even cables however, I would think it would take a more patient knitter than me to do this ie think hand knitter!

This Pingouin garter stitch model operates with cams that catch the tail of the shamrock piece and by doing this it releases the tension and knits a row, same going back. An important point is that the beds and the carriage must be rubbed with paraffin wax and brushed before using, though personally as the needles and carriage are metal and the beds similar to passap ie some sort of plastic or resin, then I do not see why normal gun oils would not do the job, and I have tested this out with the 2nd machine and it appears to work fine.

If I were to set about knitting anything with the Pingouin TP3 garter stitch knitting machine then I would use cut and sew - soo much less hassle as it knits beautifully but re fiddling with the needles and applying the necessary weight would cause me pain.
If you make a mistake then that is where the fun begins, there is a free pass on the carriage and if that works fine, but if it does not, then you have to separate the beds via knobs at either end, then lift up the carriage and in my case start all over again, the last thing you want to do is force it and break the latches of those precious needles.

I need not say it, but I love this machine and feel very lucky to get my hands on it - the next bundle of Pingouins are of the initial design and I have to get these out again to test them for any problems and of course each time I take out these wonderful pieces then my knowledge of the machine increases. I do not have so many needles for these 3 machines and it took some time to travel to get them but you know my motto, if you have a vintage machine you love then you must get your hands on another for spares. Of course this means you need storage space and I am sad to say mine is rapidly being accommodated, however, I am getting a bit more selective of what I buy now - its a case of necessity!


Thank you Maggi - it is so interesting to see and get to know machines I've never even heard of before. That was fascinating reading. Terri :-)