


Pingouin Garter Stitch Machine
- Maggi Bloice

- Jul 18, 2021
- 4 min read
Updated: Aug 14, 2022

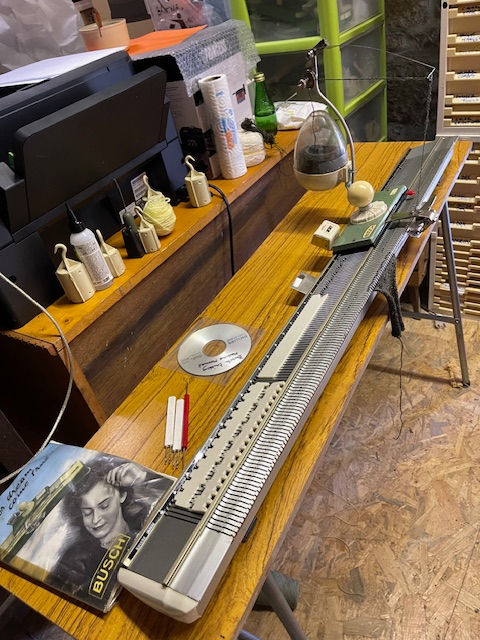
Pingouin TP3 or 4 - not too sure
This is one of the latest of the rare Pingouin Garter Stitch machines - it has the look of a piece of 1960's furniture and I would not hesitate for second to have it set up in my living room. The colour is a polished red and the carriage (well used) is made of cast iron and is mid grey. The lady I bought it from in the South of France kindly agreed to post it for me and that was no mean task as it weighed over 35 kg. It took me all my time to get it into the house. After unpacking the fun of setting it up comes to play, however once I had discovered what all the different parts were, it was simple enough.

What is different about a Garter Stitch machine
A garter stitch machine can knit plain and purl stitches with one pass of the carriage - I know there are the Brother electronic garter carriages, but they are way slower than this machine. It is relatively easy to select needles then knit. If you take a look at the needles in the pic you will see they are double ended and that is the way to tell a garter stitch machine that will knit easily. I know only of two or three makes and the other well known one is the Prior. This machine is a weight driven machine and it simply will not knit unless evenly weighted. I have now acquired three TP2 Pingouins and why - because spares are almost impossible to get for these machines. There are 3 different types of needles so one must be careful when buying if you ever get the chance and to ensure you have the correct needles for your machine.

Setup easy or not!
To set up this machine, you have to place your needles in the slots and in my case I used 40 needles and they lay across the bed so that you can insert the comb - not an easy manoeuvre. You have to lift the comb with your left hand and thread it with the other using a wire with a piece of shirring elastic attached. Not easy I can assure you. The comb then rests on the needles and you can then begin to cast on. Once you get the idea ie after about 20 tries, its fairly easy, and involves threading the yarn through the first eyelet then over a tension wire of sorts then down into a removeable threader in the carriage. If you use the whole comb then there are comb holders set under the bed - unfortunately too far apart for the initial comb size. This machine is lubricated by using only paraffin wax and oddly enough in the case of this model - Vaseline!

New tweaks - edge stitch cams
Now this Pingouin has a few extra tweaks and one of them is a pair of edge stitch cams that are knocked off when the machine gets to knit ie it tightens up initially and when it passes the edge cam it then has no tension to speak of and again once it reaches the other end it tightens up again. As with all machines it requires patience (not something I am famed for) however I persevered and eventually they loosened up (a few curses helps). Now we come to the important part and that is the carriage. The beds on this machine are parallel because the needles slide across and knit when the carriage passes. There are a number of setting, namely for garter stitch, purl, plain and the carriage right that knits on that side and carriage left that knits from the left ie casting on for instance with say rib and the most important one the centre setting that is used for most of the garter stitch and ribs ie it knits plain and purl at the same time.

200 needles instead of 160 on the older model
There are 20 stitch size settings although I feel the thickest yarn you could use is 4 ply. I used my favourite Bramwell acrylic as a sample yarn, all machines seem to love this yarn. It is easy to set up your needles with a ruler ie in my case I pushed 4 needles to operate from the back bed and 4 from the front bed to attain a sort of basket weave and knitted about 6 rows of each. The sample shows the kind of stitch patterns that can be attained. Finally I have to say that this is a serious weight driven machine and if the weights are not set right it just does not knit - when the carriage gets stuck and it does initally often then the beds have a key that allows separation slightly so you can remove the carriage and the needles etc ie to my mind the point of no return.

Final Sample
This sample shows the different types of stitches in general ie beginning with one by one rib, then going on to garter stitch followed by a basket weave type stitch then a purl pattern stitch followed by purl then stocking stitch. One thing you have to remember to do is to change the stitch sizes when changing to the various patterns ie one by one rib is entirely different stitch size when going to garter stitch. I should just mention that there are no jacks on this machine nor are they necessary ie the Prior uses the jack (similar to the pusher method on a Passap) there are 200 stitches and its a 4 mm gauge. Another great addition to the museum collection and hopefully its been saved for the future all going well, (note 275 needles came with this - well pleased.)


Hi i have a prior pur home knitter i was just wondering if the pinquion knitting machine has same size needles the one ive got is very old and do you know where i can get patterns for this machine thankyou
Hey Maggy, So glad you've posted about the Pingouin machines. I managed to grab one which is a 160 needles with a metal bed painted in an ugly pinkish color (at this stage requiring a good dust removal + waxing/oiling job but looking in excellent shape and complete). There is no mention of any number on the beds or books, just on the needle box which says "T303 for models T3 and T4". So I guess mine is T3 and yours is the T4 as it is obviously a later model.